Stuck at Lock Screen on Windows 11? Here’s the Fix:
For all the good things that Windows 11 brings, there’s also a slew of bugs that make the ‘next-gen’ experience less than ideal. One annoying issue affecting many early adopters is a situation in which users get stuck at the login screen – The sign-in form doesn’t appear, so a restart is required to boot successfully.

This behavior is typically reported after Windows 11 is forced to return to life after being in hibernation – Most issues have reported that this problem occurs on laptops and ultrabooks after they open the lid after closing it previously.
After digging around for possible causes, we uncovered that the issue is almost always related to a Windows 11 bug brought about by build 22000.4. A few insiders have already confirmed that Microsoft is already working on an official fix that will stop this problem from appearing.
But until we get an official fix from Microsoft, there are still a few verified fixed that you can enforce in order to ensure that you don’t become stuck at the login screen on Windows 11.
Reload the login interface
If you’re looking for a quick fix that will allow you to force the login screen to appear without the need to reboot your computer, try pressing Ctrl + Alt + Delete. This will force the sign-in interface to appear, allowing you to log in with your account.
But keep in mind that this is not a permanent fix – This is merely a workaround that will allow you to get past the stuck log-in screen without the need to restart your computer.
If you’re looking for a permanent fix, move down directly to method 3 below.
Restart your PC
Another temporary workaround is to simply restart your computer forcibly, forcing your Windows 11 PC to boot normally rather than resume from a hibernation stage.
But keep in mind that you won’t be able to restart normally as the power menu won’t be visible at all. The only way to restart really at this point is to force shutdown by pressing the power button on your PC.

Note: If you’re on a laptop, you’ll need to long-press the power button until power is cut. Shortpessing the power button will only force your PC to enter hibernation again (unless you modified the default behavior of your power button).
As you can see, this is not an elegant solution, so consider enforcing one of the methods below in order to prevent this issue from occurring in the future.
Installing every pending update
Insider talk is suggesting that Microsoft is very close to resolving this issue with the next Windows 11 build available through the Dev Channel. So before you take any drastic measures that will ensure that this issue doesn’t happen, you should first ensure that you install every pending Windows Update.
Important: Fixes addressing critical system processes typically arrive through Important or Critical updates, but you should install every pending update just to be sure.
Follow the instructions below to install every pending update for your Windows 11 version and see if this fixes your sign in issues:
Note: You might not be able to access Windows Update using the GUI. If this is applicable, you’ll need to boot in safe mode. We’ve included step-by-step instructions on how to enter safe mode. In case you are able to get past the login screen and use Windows normally, start directly with step 5.
- To enter Safe Mode, start your computer normally, insert a compatible Windows 11 installation media and press any key when asked to boot from it.

Press any key to boot from the installation media - Once you’re inside the Windows Installation screen, press Shift + 10 to open up an elevated Command Prompt.
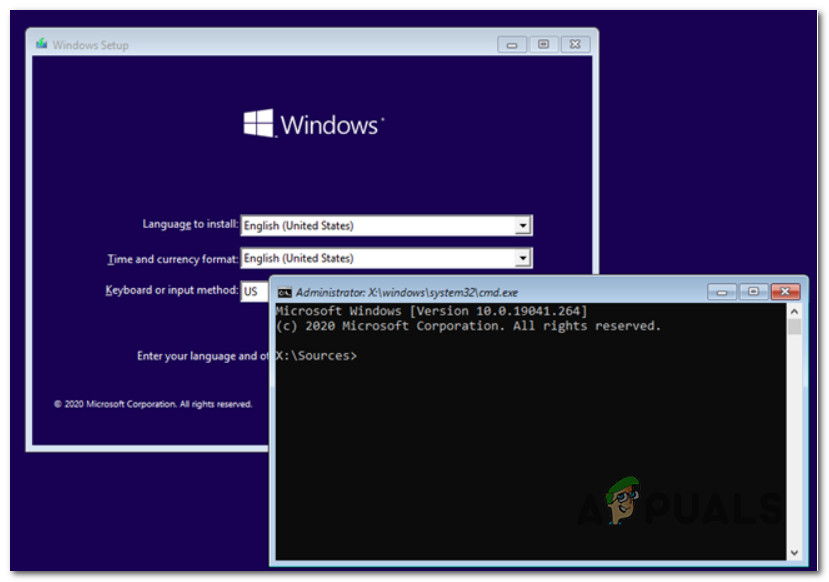
Open a CMD prompt Note: If you don’t have a compatible installation media at the ready and you don’t want to create one from scratch, you can also force the Advanced Options menu to appear by forcing 3 consecutive system interruptions during the boot sequence. From there, you can open an elevated CMD prompt and continue with the steps below.

Open up a CMD Window - Inside the elevated CMD prompt, type the following command and press Enter to configure your PC to boot in Safe Mode:
bcdedit /set {default} safeboot networkNote: This will force your Windows 11 PC to boot in Safe Mode with Networking, which will allow you to install the pending updates.
- After the command has been successfully processed, you can close the CMD prompt as well as the Windows Repair window before removing the installation media and allow your PC to boot in Safe Mode with Networking.
- After your Windows 11 PC boots in Safe Mode, open up a Run dialog box by pressing Windows key + R. Next, type ‘ms-settings:windowsupdate‘ inside the text vox and press Enter to open up the Windows Update window of the Settings app.
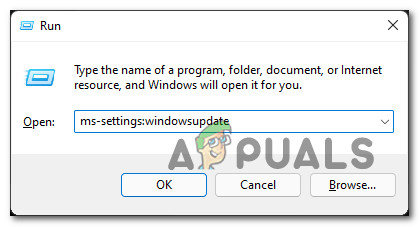
Opening the Windows Update screen - At the User Account Control, click yes to grant administrative privileges.
- Inside the Windows Update tab, move over to the right-hand section of the screen and click on the Check for Updates screen.
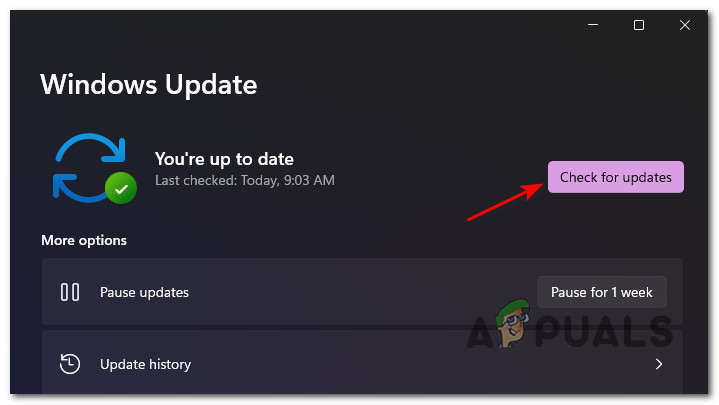
Checking for Updates - If a new update is found, Windows 11 will start to download it and install it automatically (depending on your settings). If the installation doesn’t start automatically, click on Install Now from the list of options.
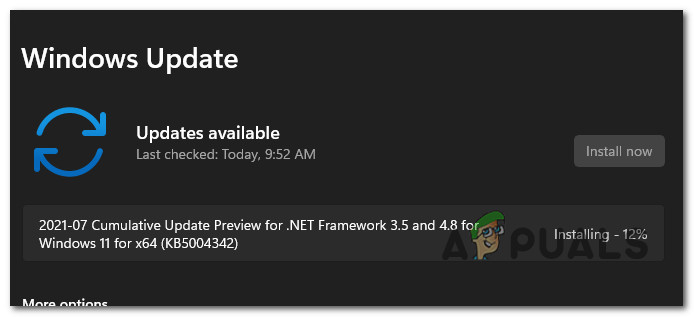
Install the pending Windows 11 updates automatically - When you’re prompted to restart, do so and check if the sign-in problem is fixed once the next startup is complete.
Note: In case a lot of Windows Updates are pending, you might be prompted to restart before every pending update gets installed – If this happens, restart as instructed but return to the Windows Update screen to continue the installation of the remaining updates. - Go through the signup screen normally and see if the problem is now fixed.
- Now to configure your PC to boot normally again, press Windows key + R to open up a Run dialog box. Next, type ‘msconfig’ and press Enter to open up the System Configuration menu.
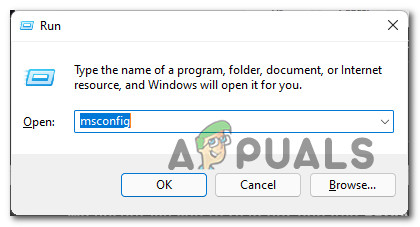
Open up the System Configuration utility - Inside the System Configuration menu, access the Boot tab and uncheck the box associated with Safe boot and click Ok to save the changes.
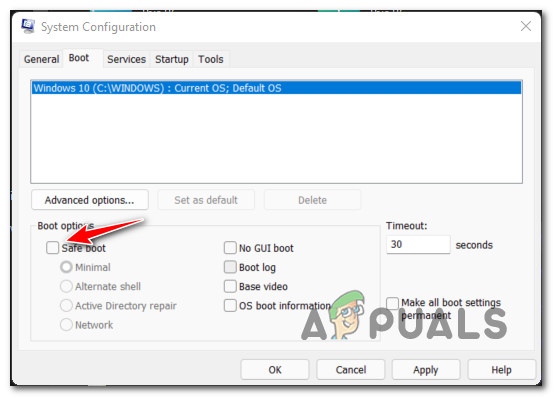
Disable safe boot
In case the issue is still not resolved, move down to the next potential fix below.
Disable Lock Screen Behavior on Windows 11
If none of the potential workarounds have been effective in your case, the only thing you can do at this point in order to avoid the scenario in which your Windows 11 PC gets stuck at the login screen is to effectively disable the lock screen from the Settings menu.
This will ensure that the scenario in which this bug occurs can’t occur anymore as the lock screen doesn’t appear anymore when you return your PC from sleep or idle mode.
By default, Windows 11 is configured to automatically display the lock screen when the PC returns to life after a period of inactivity. But this behavior can be easily changed from the Settings menu.
Follow the instructions below to learn how to effectively turn off the Lock Screen feature in Windows 11:
Note: In some situations, you might be unable to get past the login screen. In this case, you’ll need to boot in safe mode. If you can get past the login screen by restarting, skip directly to step 5.
- Insert a Windows 11 compatible media and press any key to boot from it.
Press any key to boot from the installation media Note: If you don’t have installation media, you can either create one from scratch or you can purposely interrupt the booting sequence 3 times in a row to enter the Recovery menu.
- Once your PC successfully boots from the installation media, press Shift + 10 to open up an elevated Command Prompt window.
Open a CMD prompt - Inside the elevated Command Prompt, type the following command to configure your computer to boot in safe mode:
bcdedit /set {default} safeboot minimal - Reboot your computer, take out the installation media and wait until your Windows 11 PC boots in Safe Mode.
- Press Windows key + I Key to open up the Settings menu of Windows 11.
- Once you’re inside the Settings menu, select Personalization from the left-hand vertical menu.
- With the Personalization tab selected, click on Lock Screen from the menu on the right.

Accessing the Lock Screen settings on Windows 11 - Next, from the dedicated Lock screen settings, move over to the right-hand menu and click on Screen timeout (under Related settings).

Accessing the Screen timeout menu - Next, adjust the screen behavior to Never if you don’t want to be in a scenario where your screen turns off, forcing the login screen to appear during periods of inactivity.
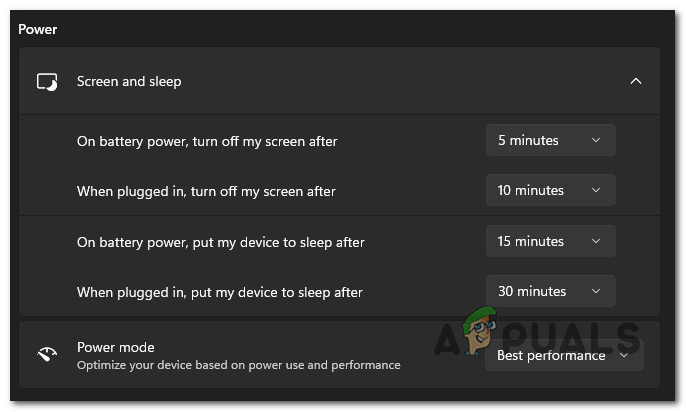
Disabling the turning off of the screen
Additionally, if you want to keep the default power-saving behavior where your Windows 11 screen shuts down during long periods of inactivity, you can simply disable the sign-in process. Here’s how to do this:
- Press Windows key + I to open up the Settings menu on Windows 11.
- Once inside, click on Accounts from the vertical menu on the left.
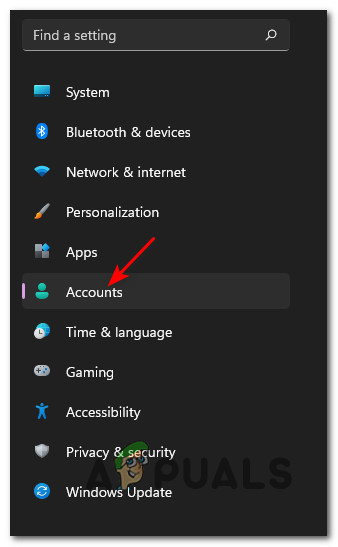
Open the Accounts menu on Windows 11 - With the Accounts tab selected, move over to the right-hand pane and scroll down to Additional Settings.
- Next, change the behavior of the If you’ve been away, when should Windows require you to sign in again? option to Never.
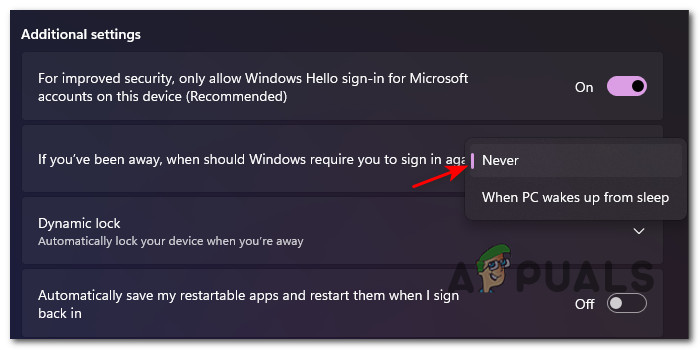
Disable Sign-in after hibernation or idle periods on Windows 11
Note: If you were previously able to enforce this fix by booting from safe mode, you’ll need to prevent your OS from booting in Safe Mode at every startup. To do this, press Windows key + R and type msconfig. Inside the System Configuration menu, access the Boot tab and uncheck the box associated with Safe Boot.


My ASUS F15 Tuf show this exactly issue after upgrading to Windows 11. The problem doing this tips on the post, disabling those functions will leave your computer unsafe with the login screen disable. Anyone can use the computer and access my files. I have to lock manually always. Microsoft should fix this security problem soon.